Donor Management System
This article will cover how to import a large number of Contacts into your DMS at once using the Bulk Import tool for Contacts.
Preparing for Import
1. Download our two handy Data Templates, and use them as guides when preparing your contact data for import. All you have to do is copy the Template column names, and paste them directly into your data's corresponding columns.
Importer Template for Contacts- Individuals
Importer Template for Contacts- Organizations
Tip: Pay special attention to columns labelled Mandatory (green) and Recommended (yellow), so you can be sure to include the information that the DMS needs in order to map your Contacts successfully.
If they aren't relevant to your import, feel free to leave out any Optional (grey) columns from your import file.
2. For a successful import, your Contacts must be sorted by Contact Type (i.e., Individuals and Organizations). For this, simply sort your Contact data into two separate .CSV files (one file for Individuals, and one file for Organizations; see two templates above). You can then perform two separate imports (one for each .CSV file) following the instructions in this article.
3. You'll need to ensure that the data you'll be importing is saved as a Comma-Separated Values (.CSV) file:
 How to save as a .CSV file in Excel
🎥 Need a walk-through of the 'Preparing for Import' steps above? Check out this short video tutorial.
(Note: This video contains no audio.)
Accessing the Import Tool
Once you've finished organizing your data based on the Template/s above, you're ready to start the import into your DMS!
1. Login to your DMS and visit the Contacts tab
2. Under Advanced Actions on the right, select Bulk Import Contacts.
 Bulk Import Contacts
Note: Don't see the Bulk Import tool for Contacts in your DMS? Reach out to our team at info@canadahelps.org and we'll get you set up!
3. On the next page, you'll see the 4 steps required to import your Contacts.
 Four steps to complete the import
Importing Your Contacts
Step 1: Choose Your Data Source
1. The Data Source field will be pre-selected for you as Comma-Separated Values (.CSV) format.
2. Click on Choose File and select the data file you'd like to import
3. If your data file has column headers, check off First row contains column headers to ensure that your headers aren't imported as a Contact (but rather used to map your data).
Note: If your data file doesn't have any headers (i.e., the first row contains Contact information and not column names), leave this box unchecked.
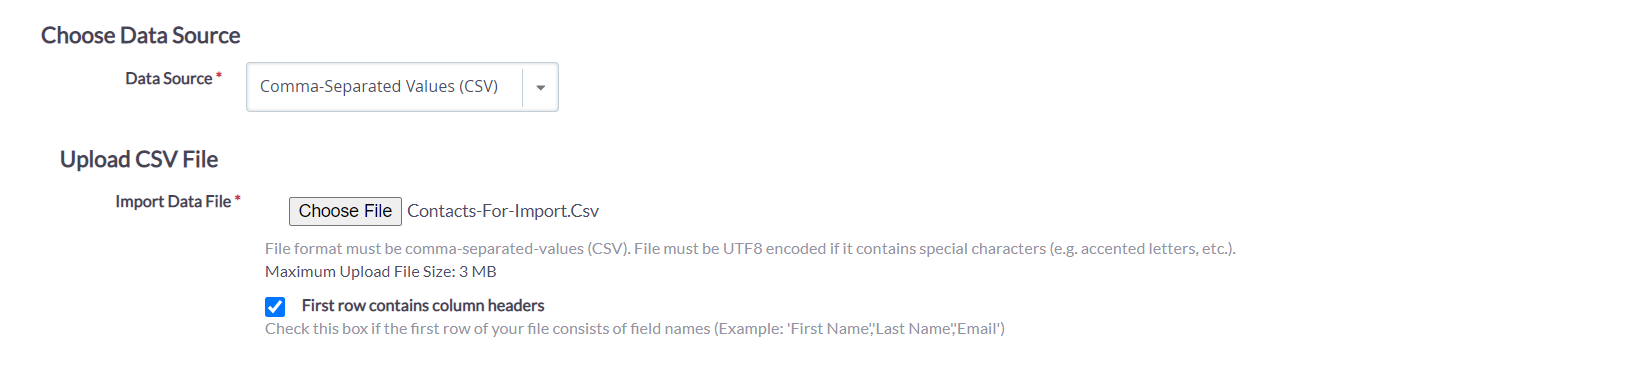 Upload Your Data
4. Tell the system what type of Contacts you'll be importing (Individuals or Organizations)
Reminder: The Import tool requires Contacts to be imported separately by Contact Type.
See Preparing for Import (point 2) above for more information.
 Importing by Contact Type
5. Select what you'd like the Import tool to do if it comes across duplicate Contacts during import:
- Skip: if any duplicate contacts are detected, any updates being imported will be skipped
- Update: if any duplicate contacts are detected, the import tool will update any existing information with what is being imported
- Fill: if any duplicate contacts are detected, the import tool will only fill in the blank fields. If information already exists in a field, it will stay the same.
- No Duplicate Checking: the import tool will not check for any duplicates during the import
6. If your data includes any dates (e.g. Date of birth, Deceased date), select the Date Format that matches the format in your data:
Note: If there aren't any dates in the Contact data you'll be importing, your selection here won't affect the import.
 Select the date format used in your data file
🎥 Need a walk-through of the 'Step 1: Choose Your Data Source' steps above? Check out this short video tutorial.
(Note: This video contains no audio.)
-----
Step 2: Match Fields
1. If you've selected First row contains column headers (step 3 above), your column headers should now show up under Column Names and your first row's data under Import Data (row 1) (and so on).
 Column Names + Rows
2. Based on the file uploaded, the Import Tool will automatically suggest the Matching DMS Field that corresponds to your rows, but you can always edit this field by selecting the drop-down arrow.
 Matching your fields to the DMS fields
3. Use the Save this field mapping checkbox at the bottom of your screen to save your mapped fields and avoid having to map them again should you need to upload an updated file to correct any errors (see Step 4: Summary).
 Save Field Mapping
🎥 Need a walk-through of the 'Step 2: Match Fields' steps above? Check out this short video tutorial.
(Note: This video contains no audio.)
------
Step 3: Preview
1. If there are any obvious errors with your data, the Import Tool will prompt you to review a list of rows before proceeding to the final step.
 Image caption
Here are some of the most common formatting errors and how to resolve them:
- Province
- For all Canadian Provinces and the American States, please use the two-letter abbreviations (e.g. Ontario as ON, Prince Edward Island as PE, California as CA, Washington as WA).
- Country
- Countries can be spelled out in full (e.g. Canada, United States of America, Great Britain) or using the two-letter abbreviations (e.g. CA, US, GB)
- Email
- Must be imported as a valid email address in proper format (e.g. noname@domain.com)
- If the email provided does not include a period or contains a comma instead, it will get flagged by the import tool
2. In this step, you can also Tag all contacts or add them to a Group.
- Add imported records to a new group: Create an entirely new Group to add all Contacts imported here
- Add imported records to existing group(s): Add all Contacts imported here to an existing Group in your DMS
- Create a new tag: Create an entirely new Tag an apply it to all Contacts imported here
- Tag imported records: Tag all Contacts imported here with an existing Tag in your DMS
Note: If you'd like to create a hierarchy of your newly created Groups and/or Tags (i.e., apply a parent group/tag), we recommend doing this after your Bulk Import.
---> Learn how to manage an existing Group or manage an existing Tag.
 Add Imported Contacts to new/existing Group and apply new/existing Tags
3. Once you've reviewed your mapped fields and finished assigning any Groups/Tags (if applicable), scroll to the bottom of your page and select Import Now to complete your bulk import.
Note: Depending on how large the file you're importing is, the completion time will vary. Make sure not to close/exit this page until you've been brought to the Summary page (next page).
 Completing the Import
🎥 Need a walk-through of the 'Step 3: Preview' steps above? Check out this short video tutorial.
(Note: This video contains no audio.)
-----
Step 4: Summary
This is the final step of your data import. Hooray!
1. If there were no errors with the import, the number of Valid Rows will match the Total Rows. If this is the case, you can select Done, as there's no further action required of you.
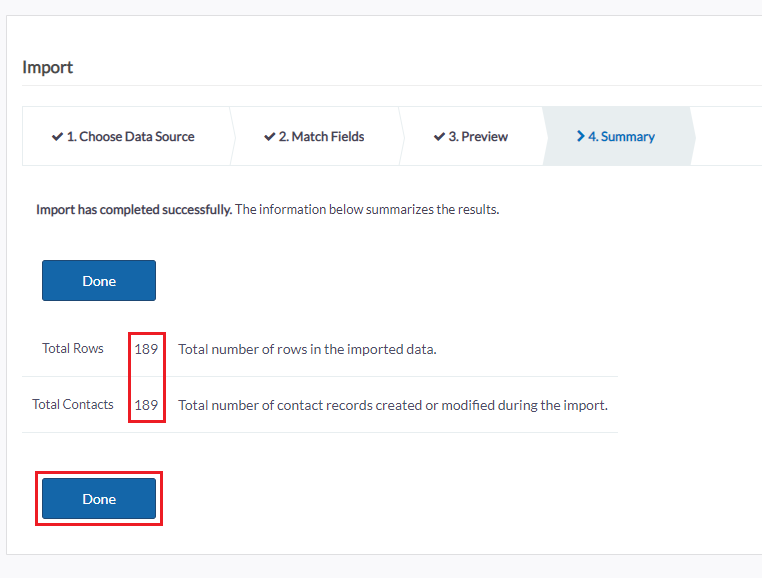 A successful import
2. On the other hand, if the Import tool detected any errors (e.g., mismatched Contacts, unclear duplicates) during the import, it'll produce a file/s for you to review:
 Import errors to review and address
3. Depending on the amount of records needing correction, you can decide how you'd like to proceed:
- You may want to make the necessary changes to your data file and repeat the import steps outlined above; OR
- You may prefer to simply add/modify these Contact records manually in your DMS directly
🎥 Need a walk-through of the 'Step 4: Summary' steps above? Check out this short video tutorial.
(Note: This video contains no audio.)
Questions?
If you have any questions as you complete the Bulk Import, don't hesitate to contact our team. That's what we're here for!
What's Next?
Once you've finished importing all of your Contacts, you may want to check out how to use the Import Tool to bulk upload Contributions as well.
Or, if you've finished with all of your bulk importing, go ahead and check out all of this newly-imported Contact data in your DMS!
Tip: Perform an Advanced Search to filter your Contacts by whatever Source name you gave your import (e.g., May 2023 Import).