Donor Management System
You can use the Campaigns tab in your DMS to track and centralize all donations pertaining to the same fundraising appeal, whether online or offline.
Overview
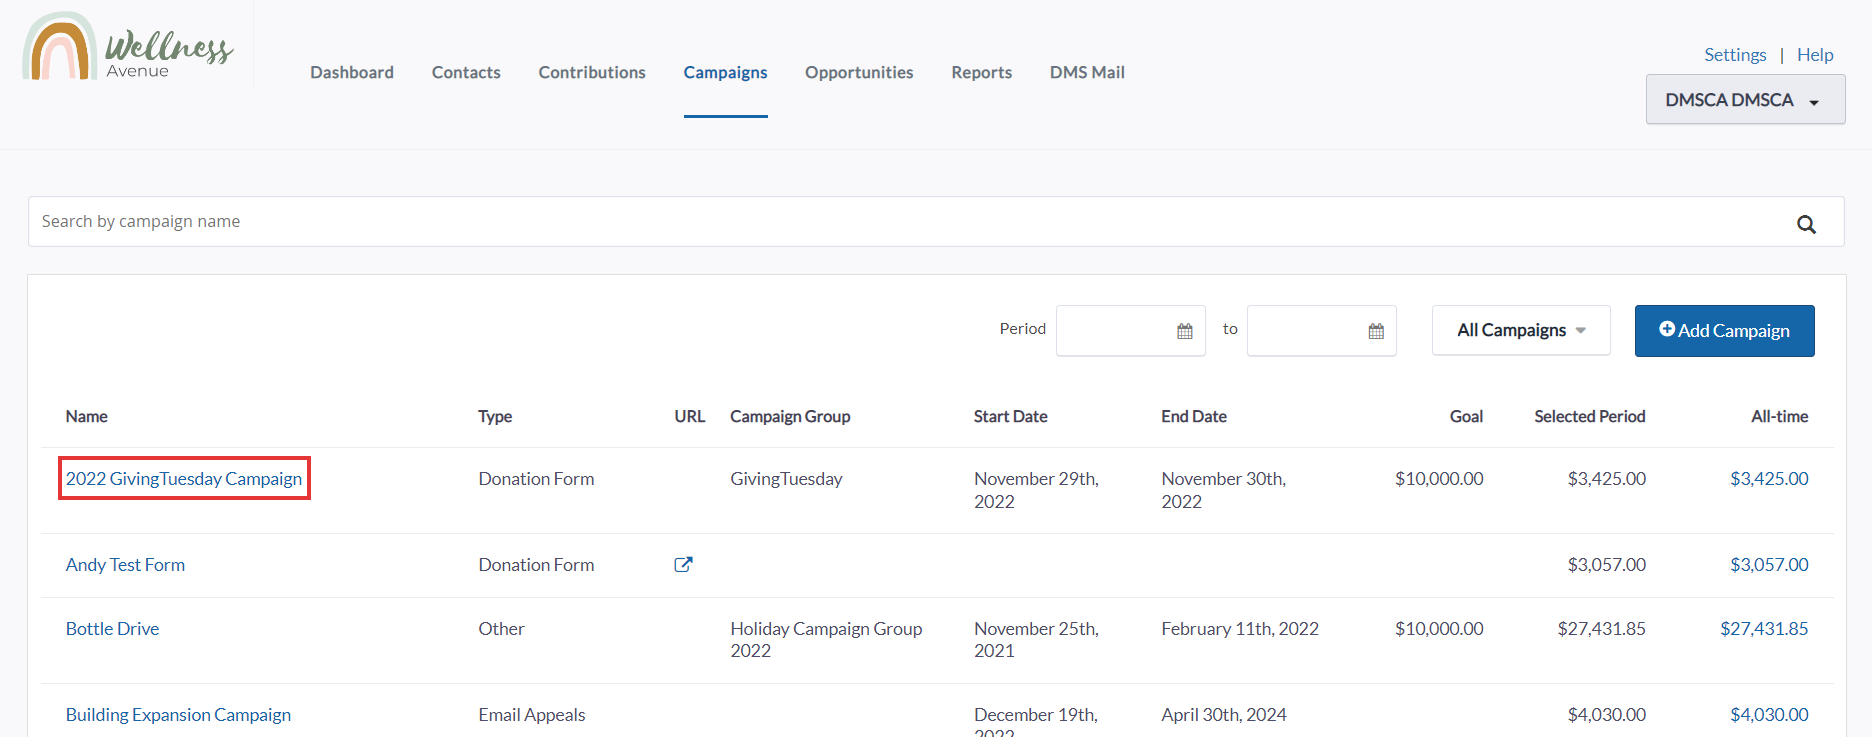
By selecting Campaigns in the Main Menu, you will be directed to the main screen of the Campaigns Tab.
The main screen of the Campaigns Tab presents a list of every fundraising Campaign you have undertaken online through CanadaHelps or have added directly in the DMS.
To access a Campaign record, simply click on the campaign's name. You can also add your own Campaigns from this Tab by selecting Add Campaign in the top right corner.
 Overview of the Campaigns Tab
Considerations
- Campaigns coming from CanadaHelps.org that are Inactive won’t be automatically marked as Inactive in the DMS. CanadaHelps.org P2P and Events pages cannot be deactivated in the DMS.
- Since you might still be receiving recurring donations from these Inactive CH.org Campaigns, the same Campaign in the DMS needs to be Active to receive those donations.
- If you delete a campaign originally created in your CH.org account, it will not be deleted in your DMS. This action will be overridden the next time we sync your CanadaHelps data into your DMS.
Main Campaigns Screen
List Columns
 Campaigns list columns
- Name: the name of the Campaign.
- Type: the Type of the Campaign (e.g. Donation Form, Events, Peer-to-Peer, etc.)
- URL: icon redirecting you to the Campaign’s landing page
- Campaign Group: group created in the DMS to help organize your Campaigns (e.g. Holiday Events)
- Start Date: the date your Campaign is set to start.
- End Date: the date your Campain is set to end.
- Goal: The monetary goal of the Campaign.
- Selected Period: The total raised in the selected period (applicable when filtered)
- All-Time: The all-time revenue raised by the Campaign.
Rows
 Cycle through pages at the bottom right corner of the Tab
- The default number of Rows displayed on the Campaigns Tab is set to 50.
- To adjust the number of Rows of Campaigns displayed in the list view, scroll to the bottom of the page and press the “up” or “down” arrows on the box that is labelled Rows.
- To the right of the box labelled Rows are the number of pages of rows, the total number of Campaigns in your DMS, as well as the ability to navigate to the next page list view.
- To navigate to the next page of Campaigns, click the arrow pointing right on the far right side of the page. Click on the arrow pointing left to go back to the previous page.
Managing a Campaign
Viewing a Campaign's Details
1. To view details about a specific Campaign, select the Campaign name.
 Select the Name of your Desired Campaign to see its details
2. You'll then be directed to the Campaign Details page where you can see and edit all key details about that Campaign.
 See all the details of your desired Campaign
Fields
- Campaign Title: the name of the Campaign.
- Campaign Type: the Type of the Campaign (i.e. Charity Profile, CH Campaign, Donation Form, Events and P2P).
- Fund: the Fund associated with the Campaign.
- Campaign Group: used to organize a group of Campaigns (e.g. Holiday Events).
- Goal: a monetary goal for your Campaign.
- Start Date: the date and time your Campaign is set to start.
- End Date: the date and time your Campaign is set to end.
- URL: The URL linking to your Campaign’s landing page.
- Is Active: indicates that your Campaign is active.
----
Viewing Donations to a Campaign
1. To view all Contributions associated with a particular Campaign, click on its All-Time $ amount
 Select the All-time Amount of your desired Campaign to see a breakdown of all its donations
2. You'll then be directed to a screen with a list of all Contributions associated with that Campaign.
Tip: Here, you can perform Actions on one or more of this Campaign's Contributions. You can also manually record an offline Contribution to have it count towards this campaign.
 Image caption
----
Filtering Your Campaigns
By Date
1. To filter all your Campaigns by a specific Start Date and End Date, visit the main Campaign tab.
2. Here, select the a start and end date you wish to filter by in the empty Date Period fields.
 Filter by Campaign Period
By Campaign Type
1. To filter all your Campaigns by Type, visit the main Campaign tab.
2. Here, select All Campaigns and then choose your desired Campaign Type
Note: The default Campaign types in your DMS include Charity Profile, CH Campaign, Donation Form, Events and P2P, but you can add new Campaign types under Settings > Manage Campaigns, or when creating a new offline Campaign.
 Filter by Campaign Type
What's Next?
Now that you're familiar with the main Campaigns tab as well as a campaign's detail screen, learn more about the difference between a CanadaHelps (online) campaign, and a DMS (offline) campaign.