Donor Management System
Note: Tax Receipts can now be issued in French!
After adding a single or multiple Contributions, you can issue Tax Receipts to the Contacts associated with those offline Contributions.
But before issuing your first DMS tax receipt, if you haven't already, make sure you first:
- Configure your Tax Receipt Settings
- Modify the Default Tax Receipt Thank-You Note
- Modify the Default Tax Receipt Email Message
🎥 Prefer to watch a guided walk-through of all things Tax Receipting in the DMS? Check out our Tax Receipting Webinar!
Considerations
- English & French Tax Receipts: Receipts will be issued based on a contact's language preference in their profile. Note: If a donor does not have a preferred language set (or has language other than French/English), receipts will be issued in English as default.
- Contacts with no address (1) and already receipted Contributions (2) are not eligible for Receipting. Before issuing these receipts, make sure to update your Contact (1) and issue a duplicate Tax Receipt (2).
- You can't receipt Contributions coming from CanadaHelps.org (Contributions that have their Source as CanadaHelps). CanadaHelps is the receipting party for all Online Contributions (not including ticketed events) coming from CanadaHelps.org.
- When you receipt an offline Contribution in the DMS, your organization is the receipting party.
- You cannot issue Combined Tax Receipts for In-Kind Contributions due to the unique nature of each In-Kind donation.
- Tax Receipts do not display the currency of the contribution amounts (the CRA and IRS do not require it).
Issuing a Single Tax Receipt
1. Go to the Contributions Tab
2. Search for the specific Contribution you wish to issue a Tax Receipt for
 Search for a single Contribution
 Select the Contribution amount
Important: Selecting Issue Tax Receipt does not immediately issue the receipt. You will be taken to a landing page where you can decide to generate a Preview or issue the receipt in multiple ways.
 Issue Tax Receipt
5. If needed, select Preview to see a preview of the Receipt before actually issuing it
Reminder: When you preview a tax receipt, the system will show a placeholder value as the receipt number. Once you select Issue Tax Receipt, it will be assigned a new, unique receipt number.
 Preview tax receipt
6. You can choose how you would like to thank your donors with the following options:
- Manually mark Contribution as thanked:
- If you'll thank your donors separately (E.g., through a phone call)
- This Contribution will be marked as thanked and receipted in your DMS
 Mark a Contribution as thanked upon receipting
- Select from the dropdown menu the custom Thank You you wish to send with your Tax Receipt (Note: The contact's preferred language will be displayed, so you can choose a corresponding message in the right language)

7. Once you’re ready to issue the Tax Receipt, select a Delivery Method:
- Print: save your Tax Receipt(s) in PDF format to print and send to your Contacts manually, or
- Email: Email the Contact with the optional custom Thank You Message and the attached PDF Tax Receipt and Download to save the receipt as a PDF (via your backend email for receipt communications).
Note: The default delivery method is Email. If the Contact of the donation has the Do Not Email privacy setting in their profile, or does not have an email on file, the Tax Receipt will be downloaded to your computer for Printing instead.
 Choose a delivery method
Learn how to download and print Thank You letters with your tax receipts.
8. Select Issue Tax Receipt. The Tax Receipt will then be either downloaded to your computer (for you to print), or sent to the Contact’s registered email address.
 Issue tax receipt
Issuing Multiple Tax Receipts
1. Go to the Contributions Tab
2. Search for a specific Contribution, or select either:
(1) The specific Contributions you wish to issue Tax Receipts for,
(2) Every listed Contribution on the page, or
(3) All Contributions in your search criteria
Tip: Use Advanced Search to segment the Contributions you would like to receipt
 Select Contributions
- Issue Aggregated Tax Receipts (i.e., if John Smith made 5 donations, he will receive one tax receipt for all 5 donations)
- Issue Separate Tax Receipts (i.e., if John Smith made 5 donations, he will receive 5 separate tax receipts- one for each donation)
 Tax receipting options
Issuing Aggregated Tax Receipts
1. After selecting your desired Contributions, you will be directed to the Combined Receipt Export Page. You will have the chance to review and select the following:
 Issue Tax Receipt Options
- How many Contributions were selected, how many Contributions are eligible to receive an aggregated receipt, and total eligible amount
- Tax Year: which tax year to issue the Tax Receipt(s) for.
- Thank you Settings: choose how you would like to thank your donors
- Delivery Method: choose to download (and print) or email the Tax Receipt
- Also re-issue duplicates: choose to re-send Tax Receipts for Contributions that have already been receipted within the DMS
- Preview: preview how your finalized Tax Receipt(s) will look like.
2. Select Preview to see a preview of the Receipts before issuing them
Reminder: When previewing combined Tax Receipts, the DMS will show a placeholder Tax Receipt Number. Don't worry- the combined tax receipt will be assigned a new, unique tax receipt number once you select Issue Tax Receipts.
 Preview your tax receipts before emailing/downloading them.
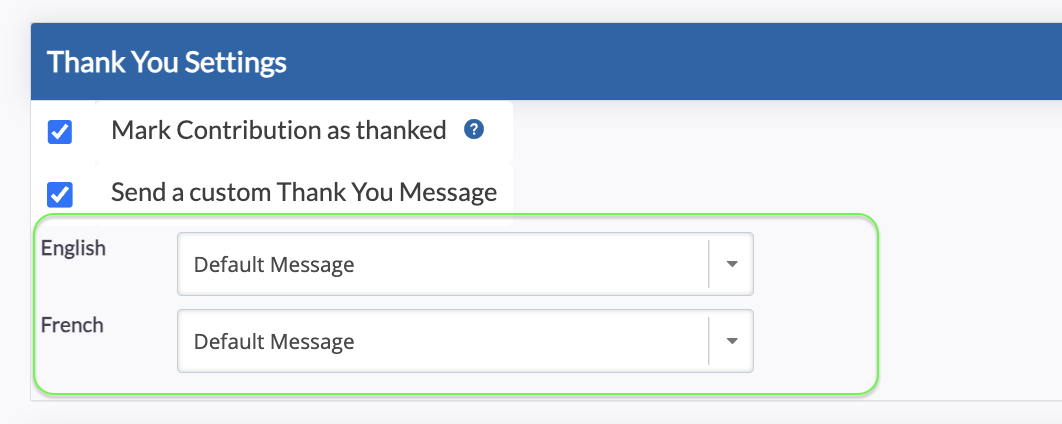
- Mark Contribution as thanked:
- If you've already thanked your donors separately
- These Contributions will be marked as thanked and receipted in your DMS
 Mark Contribution as Thanked and send custom Thank you Message Template
- From the dropdown menu, select the custom Thank You template you wish to send with your Tax Receipt (Note: There will be two different select dropdowns for French and English, this way you can select which corresponding message will go out for each language option)

4. When you’re ready to issue the Tax Receipts, select the Delivery Method to either:
- Print: save your Tax Receipt(s) in PDF format to print and send to your Contacts manually.
- Email: Email the Contact with the optional custom Thank You Message and the attached PDF Tax Receipt and Download to save the receipt as a PDF (via your backend email for receipt communications).
Note: The default delivery method is Email. If any one of the Contact(s) of the donations have the Do Not Email privacy setting in their profiles, or does not have an email on file, that Tax Receipt will be generated for Printing instead.
 Select delivery method
5. Then, select Issue Tax Receipts. The Tax Receipt(s) will then be downloaded or sent to the Contacts’ registered email address.
 Issue aggregate tax receipt/s
Issuing Separate Tax Receipts
1. After selecting your desired Contributions, you will be directed to the Separate Receipt landing page. You will have the chance to review and select the following:
 Issue separate receipts landing page
- How many Contributions were selected, how many Contributions are eligible to receive an aggregated receipt, and total eligible amount
- Thank you Settings: choose how you would like to thank your donors
- Delivery Method: choose to print or email the Tax Receipt
- Also re-issue duplicates: choose to re-send Tax Receipts for Contributions that have already been receipted within the DMS
- Preview: preview how your finalized Tax Receipt(s) will look like.
2. Select Preview to see a preview of the Receipts before actually issuing them
 Preview separate tax receipts
 Also issue duplicate receipts
- Mark Contribution as thanked:
- If you've already thanked your donors separately
- This Contribution will be marked as thanked and receipted in your DMS
 Mark Contribution as Thanked (override)
- Select from the dropdown menu the custom Thank You you wish to send with your Tax Receipt (Note: There will be two different select dropdowns for French and English, this way you can select which corresponding message will go out for each language option)
- Print: save your Tax Receipt(s) in PDF format to print and send to your Contacts manually.
- Email: Email the Contact with the optional custom Thank You Message and the attached PDF Tax Receipt and Download to save the receipt as a PDF (via your backend email for receipt communications).
Note: The default delivery method is Email. If the Contact of the donation has the Do Not Email privacy setting in their profile, or does not have an email on file, the Tax Receipt will be generated for Printing instead.
6. Then, select Issue Tax Receipts. The Tax Receipts will then either be downloaded to your computer, or sent to the Contacts’ registered email address.
 Issue separate tax receipts